Please Respect My Work...

All of the cards, layouts, handmade items and art work displayed on this website are copyright to me, Lynne Mizera. Of course I hope to inspire and encourage you and would be morethan happy for you to use any of my work to that end; however, please respect me and my work and do not directly copy any of my projects without crediting me or enter any of my work into any magazines or competitions without my express written permission. All my cards, layouts, projects and art work are not to be used by any commercial enterprise for any financial, marketing or commercial gain.

Tuesday, October 31, 2017

Happy Halloween!!

Well Happy Halloween Everyone - today I want to share with you my first ever Haunted House creation.  
 
These days I am totally addicted to making little houses and everything miniature to go with them.  I use the Tim Holtz Village Dwelling die as a base and let my imagination do the rest.
 
I have discovered that if I give myself total freedom to imagine and create, I will end up with an amazing and unique little structure.
 
It was interesting to me that when I was putting together this wee haunted house, no matter how hard I tried to create a creepy, scary, kind-of-evil little house, it just kept being cute; even the addition of a skull and spiders didn't do it.
 
So what I learned from this is that I do believe that I have more bubbly, positive and happy energy than the opposite, and I just don't want to scare anyone - which is not a bad thing, right?
 
So thank you for popping in today to see what I am up to and to enjoy more Halloween projects, some a lot scarier than mine, pop on over to the Mixed Up Magazine blog today where you will be amazed at the creativity and imagination of my team mates, (I know I was!).

Lynne Mizera, Spooky Paper Artist
for the Mixed Up Magazine Design Team


Thursday, October 19, 2017

Believe In Yourself...


Hello everyone!  Today I want to send this loving message out to my daughter in particular but also to anyone that may be struggling as they are trying to live their dream.  Remember it is easy for people to sow their doubts and fears for you when you are doing something different from "the usual", but do not allow those seeds to take root, instead remember all you need is to:
Know what you want,
Believe that you can, and
Keep Moving Forward no matter what.
I believe in you
Love Mom


The Graciellie Design stamp set I am using today is called "Simple Wisdom" and is the digital version of a red rubber stamp set just released by Unity Stamp Company on the first of this month.  I am using the digital version because I wanted to change the size of this lovely daffodil to fill the entire card, something you can do with a digital stamp.  I painted this image with my Kuretake Gansai Tambi watercolors, added the sentiment and edged the card front with washi tape.


Lynne Mizera, 
For the Graciellie Design Team

"Simple Wisdom" Digital Stamp set
  

Monday, October 16, 2017

Because I have a Thankful Heart

Today I am here with the Graciellie Design Team to share some mid-month digital stamping inspiration.   I created this card to remind myself to be thankful and grateful every single day for the lovely life I am living.
I have been thinking about all the blessings in my life a lot these days.  It may be because  we Canadians celebrated our Thanksgiving holiday just last week, but it is probably more likely because of the horrendous number of horrible and painful events and natural disasters that have been occurring all around me these days.  So from today forward I have decided to "Start Each Day With A Thankful Heart", because these days, what I used to call a "disaster" pales in comparison.
 
The Graciellie Design stamp set I am using today is called "Simple Wisdom" and is the digital version of a red rubber stamp set just released by Unity Stamp Company on the first of this month.  I am using the digital version because I wanted to change the size of this lovely vase full of daffodils to be larger, something you can do with a digital stamp.
 

I used my Kuretake Gansai Tambi watercolors to paint the image, added the sentiment and mounted everything using foam tape onto an embossed card front.  
 
And of course I added Rangers Stickles to the flowers and leaves for some sparkle and covered the entire jar in DecoArt Liquid Glass which made it look like a real glass jar.  So that's my mid-month inspiration for you today and pop on over to the GRACIELLIE Design Blog to see what our other designers created and to see what prizes and specials Gracie is offering up for you this month. 
And the next step in the Blog Hop is:

Lynne Mizera, With A Thankful Heart
For the Graciellie Design Team


"Simple Wisdom" Digital Stamp set


Sunday, October 15, 2017

STAMPlorations Stencil Sunday - I Am Playing With My Stencils and Foils Today!


Hello everyone! It's Baaack... our monthly Stencil Sunday over at STAMPlorations Blog.  Once a month, on a Sunday, we the STAMPlorations mixed media design team, create stencil projects to inspire you to go and play with some of your own stencils.  For my inspirational post today I decided to play with my stencils using different glues and foils, something I have been wanting to do for a while, and I just LOVE the effects I achieved...
It was an afternoon spent in blissful stencil art play as I applied different glues and pastes through my stencils, onto small canvases that had already been collaged and painted, to see what kind of effect I could get.

I played and played until I ended up with all these lovely canvas backgrounds just waiting to be finished off with the the perfect image or sentiment.
And, isn't that the whole idea behind inspirational Art Play?  To allow yourself complete freedom to just make messes until all of a sudden it isn't a mess anymore!!
So stay tuned, because I see a foiling tutorial coming in the near future, sharing all the things I learned playing around with this technique.  
Now I hope I have inspired you to want to go and play with some of your stencils and if I did, please do consider linking up your project to this month's Mixed Media Challenge, where it is always anything goes except a card, and you must use a stencil, Any Stencil, on your project.  Go HERE for all the details.

As Always, thank you for popping in today to see what I am up to.  And to make sure you never miss any of my future posts (like this foiling technique tutorial coming soon) consider entering your information into the "Following By Email" box in the right side column of this blog.  My entire post, including the photos, will pop up right in your email and you will never miss another post - easy peasy!

Lynne Mizera,
for the Stamplorations Mixed Media Design Team 
 

STAMPlorations Products Used:

PLEASE NOTE: If you are ordering from STAMPlorations use code STAMPGIRLLYNNE at checkout to receive 20% off your entire order, even sale items


Friday, October 13, 2017

Sisterhhood Of Snarky Stampers: "Z" Is For Zombies


Happy Day everyone!  It's October and time for a new challenge over at the Sisterhood for Snarky Stampers ... so you know what that means... 
Edna says: "Z" is for Zombie! 
 
 Eeeeek!
Well I just don't DO the REAL Zombie thing, coloring that much blood and guts makes me queasy, so I went looking for something that I could Stomach (no pun intended... or maybe it WAS? grin).  And I found these awesome digital images from Vera Lane called "Zombie Couple with Cat" ...  and here is what I did with the zombie couple: 

But it was that cat that stole my heart (and probably ate it! bigger grin)... I could not stop coloring that cat.  So what do you do with five Zombie Cats?  Why you RIVER DANCE! Ha!Ha!Ha!
Yup... after I found this quote and made this card I just couldn't stop laughing.  
It still makes me grin seeing all those zombie eyes in a row...

and their stiff little arms...

and then I can just see those little rotting feet going so fast they start flying off and hitting people in the audience!

Ha!Ha!Ha! snort, giggle, wheeeeze... (yes, I am a wee bit twisted in here).
I colored all these images using my Copic markers and I really did have a lot of fun coming up with the perfect shade of rotting green flesh and yellowing eyeballs.  But seriously I am so glad this challenge comes around only once a year!
So do pop on over to the Sisterhood to see what my design teamies have created because some of them are even MORE twisted than me!  And please do consider linking up your own rotting zombie creations (the snarkier the better) for a chance to crowned Queen of Snark or one of her Princesses.  You have until midnight Friday, October 27th to join in.

Thanks for popping in today to see what I am up to and please do leave me a comment if you like what you are seeing!
Lynne Mizera, Beginner Zombie Creator
for the Sisterhood of Snarky Stampers Design Team


Creating Storage In My Studio That Is Practical As Well As Pretty... by Lynne Mizera

 
Hello Everyone!  I am happy to share that I will be staying on with the STAMPlorations Mixed Media Design Team for one more term and today I am up on the STAMPlorations Blog with my first mixed media tutorial for this term.  I am really excited that I will be able to share even more ways to use your STAMPlorations stencils and stamps on mixed media projects for the next year.

Today I am sharing how I decorated this wooden storage container so that not only is it pretty but now it is also a visual example of different styles of pastes and paints through a stencil.  Something that will make it so much easier to for me to choose a product when I am starting a new mixed media project!
 
 
So pop on over to the STAMPlorations blog to read the full article and to see all the details.   As always, thank you for stopping by today to see what I am up to and please do leave me a comment if you like what you are seeing!  (I read every single one and reply when I can...)
Lynne Mizera
for the STAMPlorations Mixed Media Design Team
 
 STAMPlorations products used on this project:
Remember to use my personal discount code: STAMPGIRLLYNNE
to receive an additional 20% off your entire order at STAMPLorations - even sale items

ARTplorations Stencil Ethnic Organic One
Other Products used:
Buzz Gesso - economy ground
Dreamweaver Metallic Copper Embossing Paste
Liquitex Flexible Modelling Paste
Dreamweaver Studio 490 Crackled Texture Paste 
Inka Gold paints
Peerless Watercolor sheets
Angora pan watercolors
Copic Black Multi-liner pens

Monday, October 2, 2017

SNARKTOBERFEST, 2017 A Month-Long Card Making Event...WHO KNEW?!

Even though I have been a Sister in the Sisterhood of Snarky Stampers since inception (has it really been four years now?)  I had no idea there was an annual event called SNARKtoberfest!
 
This year we, the Sisterhood were asked if we would like to participate, and of course we said YES!  (A no-brainer, really) and I went to town making THREE cards for this totally fun event featuring stamps I received from the Crackerbox Palace Rubber Stamps  ...
 
Breaking into my hoarded paper stash from my Graphic 45 "A Ladies Diary" collection and images from a "never-to-be-touched" sheet by  From Grandma's Attic, I decided to create a few cards that have a gentle, old-fashioned feeling but with zinger quotes!
 
I thought this little cutie was just PERFECT for this particular stamp... but my very favorite is the card below which says "When sweetness fails, and tears don't work...

And the inside...
Ha!Ha!Ha!  And the reason this is so funny?  Because it's TRUE!!

This event is going on all month long and there are LOTS of prizes and you can find all the details on the Sisterhood for Snarky Stampers blog today: HERE.  And I do hope you will join in because where else can you be rewarded for being cheeky, snarky and/or sarcastic? (grin)

Lynne  Mizera
for SNARKtoberfest, 2017 and The Sisterhood of Snarky Stampers


October Is My Month For Counting Blessings...

Happy October everyone... and if you are popping in from the Graciellie Design blog hop today, Welcome to my blog!  Today I am sharing the cards I created using a brand new Graciellie rubber stamp set "May Blessings Follow You", one of several stamp sets being released today by Unity Stamps.  This stamp is available in both rubber and digital formats and with today's release there are lots of prizes and discounts and give-aways being offered.  Go HERE to find out all about them! 
I created these cards using one of my very favorite techniques using pigment powders and heat embossing:
 
This technique works particularly well with this stamp set because of the lovely line work in the design, which give a place for the colored inks to pool.

And I am detailing my process below:
 
Start by stamping and heat embossing the images on a heavy paper that will accept a lot of water.  I like to use 100lbs mixed media paper with a vellum finish.  Stamp your images with an embossing ink, cover with a fine detail white embossing powder and then heat set your images.
 
Because you need to work fairly quickly you will want to cut your paper into smaller, more manageable sizes.  I used the new Westcott rotary trimmer which works beautifully on this size paper.
The wider 9-inch platform and locking mechanism on the cutting strip holds the paper firmly in place for clean, straight cuts every time.
 
Now for the fun!  Spray enough water onto the embossed images so it starts to pool in the cells created by the embossing.  This is why it is important to use a card stock that will be able to accept a lot of water.  Watercolor paper does work but is harder to cut.
 
Once the paper is fully wet sprinkle on the pigment powders.  My favorite product are the Magenta Nuance pigment powders because I love all the the wonderful colors and how they react with water.
 
You want to work fairly quickly at this point (which is why you need to cut your images into smaller, more manageable sizes) and you will need to have LOTS of water and paper towels available to spray and blot, spray and blot.
 

You want to work quickly after sprinkling on the powders, continuing to spritz the paper with more water and encouraging the colors to move and blend.  I like to use a paint brush to help direct the colors into cells.
 
The longer you allow the ink to sit on the paper the stronger the colors will be, but watch carefully as the colors mix together and blot quickly when they begin to look muddy!
In my experience, no matter what colors you choose, the results are always lovely.
And you can continue to add more pigment powders and activate with more water until you like the results. (or until your paper can't take it any more!! Grin)
The hardest part of this entire process is waiting for the paper to dry.  And DO NO USE your heat gun, because if you force dry these pages you will either melt your embossed lines, or they wills start falling off... so Be Patient!
 
Once the papers are dry you are ready to cut out your colored images.  For this step I tried out these scissors from Westcott for fine cutting.  I particularly liked the lanyard for wearing them around your neck because for once I could always find my scissors!
 
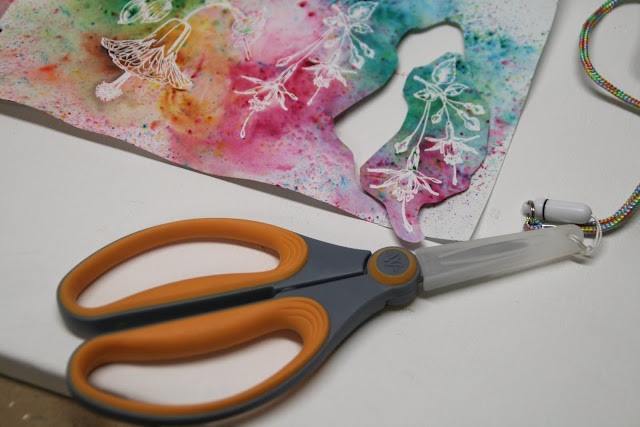
I kept my backgrounds simple, using only embossed white card stock and a few foam pop dots to create some dimension, because I really wanted to showcase these beautiful images.


So that's it for today.  I hope you enjoyed my little tutorial and now pop on over to the next stop along the way in today's Graciellie Design Blog Hop:

As always, THANK YOU for stopping by to see what I am up to today, and please do leave me a comment if you like what you see!
 
Lynne Mizera
for the Graciellie Design Team
 

Graciellie Design/Unity Stamps Used:
This set is also available in digital format at the Graciellie Design Etsy Shop


Westcott Products Used:


Westcott Rotary Trimmer
Westcott Scissors


Westcott Scissors