Please Respect My Work...

All of the cards, layouts, handmade items and art work displayed on this website are copyright to me, Lynne Mizera. Of course I hope to inspire and encourage you and would be morethan happy for you to use any of my work to that end; however, please respect me and my work and do not directly copy any of my projects without crediting me or enter any of my work into any magazines or competitions without my express written permission. All my cards, layouts, projects and art work are not to be used by any commercial enterprise for any financial, marketing or commercial gain.

Wednesday, August 30, 2017

Things You Can Make With Your Completed Coloring Book Pages - Featuring STAMPlorations Bloomtangled Coloring Book

Hello and happy day everyone! Today over at STAMPlorations they are kicking off a week-long Blog Hop and Linky Party event, full of inspiration, coloring and of course prizes featuring the brand new Bloomtangled Coloring Book. 
 
You  might remember a few weeks ago I blogged about this new book and showed you several different mediums I used to color a few of those pages (Go HERE to see that post).   Well today I am sharing some of the projects I made using a few of those colored pages - because I think pages this pretty should not remain hidden in a book! 


My first share are these four shaker cards I made using one of my coloring pages as the background to these heart balloons.
 

I the new shaker die from CUTplorations, Shaker Balloons #1-Heart to create these fun cards.

And leaving the back grounds white allow these colorful balloons to pop right off the page!

Of course a little bit of glitter from Ranger's Stickles and Glossy Accents finished off all these lovely cards.
I am pretty excited about my next creation - it's a Gift Box!  Yes, it's a tiny gift box, onlymeasuring 2x2 inches and 3/4 of an inch deep, but oh so pretty!
 

To create this box I used the We R Memory Keepers Gift Box Punch Board, and it was super easy!  But you will want to copy the coloring page onto a piece of 100lbs card stock, and then color it.
 
Once the box was punched and assembled I added lots of lovely Ranger Stickles in many, many colors to every side...
 
and the final touch are these lacey butterflies cut using the CUTlorations Flutter Zen 2 Layering Dies.  I would just love to receive a tiny little gift in this box, wouldn't you?
 
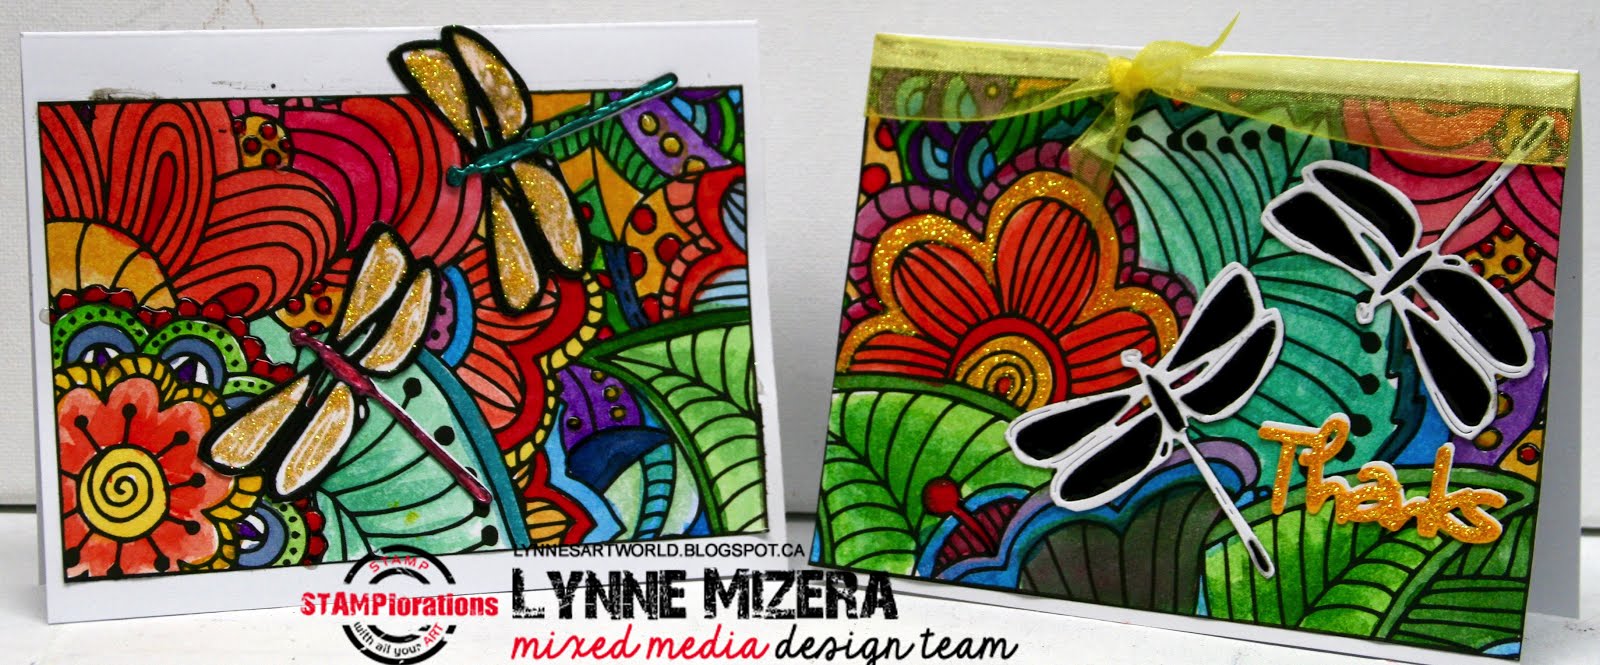
And my final project are these two bright and cheerful cards made from one of my favorite colored pages.  The page, cut in half creates two pieces the perfect size to mount on a standard-size card base.  Embellished with a couple of dragonflies from the CUTplorations Dragonfly Layering Dies,
 
and with a bit of ribbon and a die cut sentiment the card was almost finished...
except for the Ranger Stickles and Liquid Pearls I added to make everything sparkle.
 
So pop on over to the STAMPlorations blog to see what all my design team mates have created with their coloring pages, and you have until September 5th to leave a comment and/or download the free coloring page and link it up for a chance to win some prizes.


Lynne Mizera
For the STAMPlorations Design Team


 Don't forget to use my personal discount code
STAMPGIRLLYNNE
when ordering from STAMPlorations to received 20% off your entire order (even sale items).

STAMPlorations products used on these projects.
Bloomtangled Coloring Pages
CUTplorations Dragonfly Layering Dies
CUTplorations Flutter Zen 2 Layering Dies
CUTplorations Shaker Balloons #1-Heart


Sunday, August 27, 2017

Don't Be Afraid To Dream - Because Everything Starts With A Dream...

What an amazing time this is in my life right now as many of the seeds I planted for myself back in 2011 have not only germinated but are bearing fruit - and I credit a lot of my success to the power of dreaming.  I am not talking about the dreams you have while you are sleeping, but about those visions of a life totally different from the one you have now.
 
I know from experience that if you visualize this dream life (no matter how unavailable it seems right now) and speak the words of your desire out loud over and over, telling everyone how you imagine your life will be one day in the future, it can happen just as you dreamed.  So don't be afraid to dream, and to SHARE those dreams in words with everyone, because everything that anyone has ever done started with a crazy, seemingly unattainable dream!
Thank you for popping in today to see what I am up to... and please do leave me a comment if you like what you are seeing!

Lynne Mizera
for the Graciellie Design Team
 

This Magnolia Dreams digital stamps and printable paper collection I used to create this card are available at the Graciellie Design Etsy Shop.

Friday, August 25, 2017

Deconstructing An Art Journal Page - By Lynne Mizera

Hello Everyone, I hope you are having a lovely summer! I am wearing my STAMPLorations design team hat today  as I share this promised Special mixed media tutorial.  I am going to share all the steps I took to create this richly colored and textured mixed media page in my Art Journal.
Using only paint, stencils, a few die cuts, my gel pens and Ranger's Stickles and Liquid Pearls, I played uninhibitedly until I loved this vibrantly-colored two-page spread in my Art Journal.
I will demonstrate once again how you can take something that may look like a HOT MESS and turn it into a beautiful piece... because remember that quote from my tutorial post last month:
"If you hate it you are NOT finished yet!"
So go and get something to sip on because this is another one of my photo-heavy, step-by-step tutorials... Smile.
 
First Step - Add Background Color:
I am working in my 9x12 inch Dylusions Art Journal with Dylusions paint.  The paper is made to be able to take all the products we use in mixed media and is so smooth that the Dylusions paint goes on as easily as butter on warm toast.  Use any paint or ink in your favorite colors and just get blocks of color down on the page.
 
Second Step - Add a Bold Stencil Pattern:
This will be a focal point so I wanted something really Bold - I chose the ARTplorations Daisy Dance stencil and used my black gesso on a very vibrant part of my page.  Black is not a color I typically choose, but I wanted to do something really different for me.
The daisy pattern in this stencil is so large it is almost a mask and allows a lot of the background color to show through which is what I want. This pattern is too strong to apply to the entire layout, so I decided to keep it to the one page only.
Third Step - Add A Masking Stencil Pattern Or Words:
Here is where I use masks to cover my favorite bits of this background because in the next step I will be changing the look of the page completely.  The masked image will keep the original colors and patterns beneath it free from all the layers of paint and patterns to follow.  These large word masks from ARTplorations are my very favorite because they are so big that lots of my background will show through.  I use a good painters tape to stick these to my pages, because it holds firmly but releases easily, and I use lots of it underneath my masks to make sure they will not move during all the layers that will follow.  
A few things to keep in mind when deciding where to place your masks; look for brighter areas and look for lots of contrast.  Bold color transitions show up better when you are done.  I now choose a color of paint that compliments most of the colors in my background, purple in this case, and using my small round foam blending tool I cover the pages in a light layer of paint leaving spaces with the original colors.  You can continue adding paint colors over top of everything, always leaving some spots of the previous color to show.  I added some yellow-green over top the purple - which promptly turned to an icky yellowish brown. GROAN!  But I am not too worried because I know I can fix this.  Just Do Not remove the masks yet.
 
Fourth Step - Add A 2nd And 3rd Smaller Stencil Pattern:
This is where I can fix my icky background colors.  I choose a stencil pattern that compliments the original Daisy Dance but is a smaller pattern, I am using the ARTploration  Daisy Play stencil. And now I will break up all the places where I am not loving the background by pouncing paint through the stencil at random all over the page.
 
and I do not stop at one color but keep layering more colors through the same stencil at random all over the page.  next I added bright green.
 
And kept adding colors through the stencil until I liked my background.   I even added a third stencil pattern, ARTplorations Oh My Stars, down the centre of the page, just because!
 
As you can see, now the background does not look anything like the original pattern that is underneath my masks, which is what you want so when the masks are removed the images will stand out.
 
I continued to add colors where ever I didn't like the background and when I removed the masks, I ended up with THIS:
 
Fifth Step - Use A Gel Pen To Pull Out The Details
Next I use a gel pen to outline and highlight the areas to which I want to draw attention.  Because the overall layout was so dark I used a white gel pen and that made my words really pop.
Look at the difference once you choose where you want the eye to focus.  Notice that I chose to outline only a few strategically placed flowers in the path I wanted the eye to follow.  Keep this in mind when outlining and that less is more and too many outlines will make your piece look confusing or busy.
 
Last Step - Add Embellishments:
I used the CUTplorations Dragonfly Layering Dies to add die cuts in black paper to the left bottom corner of the page to help balance the heavy black pattern on the top right of the page.  I then filled the wings with sparkly Stickles and then really enhanced the flowers I outlined by filling the petals with Liquid Pearls in Cream.


Well I hope you enjoyed my tutorial this month and that it has inspired you to go and play with some of your stencils and paints. As always thank you for popping to see what I am up to today and please do leave me a comment if you like what you are seeing!
Lynne Mizera, Mixed Media Artist
 
Remember to use my personal discount code STAMPGIRLLYNNE to receive 20% off your entire order at STAMPlorations, even sale items!

STAMPlorations products used on this project:
ART HAPPENS MASK
INSPIRE MASK
LIFE IS GOOD MASK

DAISY DANCE STENCIL
DAISY PLAY STENCIL

OH MY STARS STENCIL   
DRAGONFLY LAYERING DIES


OTHER PRODUCTS USED ON THIS PROJECT:
Ranger Dylusions Journal
Ranger Dylusions Paint
Ranger Stickles
Ranger Liquid Pearls
Uni-ball Signo White Gel Pen
Sharpie White Water Based Paint Pen