Happy October everyone... and if you are popping in from the Graciellie Design blog hop today, Welcome to my blog! Today I am sharing the cards I created using a brand new Graciellie rubber stamp set "May Blessings Follow You", one of several stamp sets being released today by Unity Stamps. This stamp is available in both rubber and digital formats and with today's release there are lots of prizes and discounts and give-aways being offered. Go HERE to find out all about them!
I created these cards using one of my very favorite techniques using pigment powders and heat embossing:
This technique works particularly well with this stamp set because of the lovely line work in the design, which give a place for the colored inks to pool.
And I am detailing my process below:
Start by stamping and heat embossing the images on a heavy paper that will accept a lot of water. I like to use 100lbs mixed media paper with a vellum finish. Stamp your images with an embossing ink, cover with a fine detail white embossing powder and then heat set your images.
Because you need to work fairly quickly you will want to cut your paper into smaller, more manageable sizes. I used the new Westcott rotary trimmer which works beautifully on this size paper.
The wider 9-inch platform and locking mechanism on the cutting strip holds the paper firmly in place for clean, straight cuts every time.
Now for the fun! Spray enough water onto the embossed images so it starts to pool in the cells created by the embossing. This is why it is important to use a card stock that will be able to accept a lot of water. Watercolor paper does work but is harder to cut.
Once the paper is fully wet sprinkle on the pigment powders. My favorite product are the Magenta Nuance pigment powders because I love all the the wonderful colors and how they react with water.
You want
to work fairly quickly at this point (which is why you need to cut your
images into smaller, more manageable sizes) and you will need to have
LOTS of water and paper towels available to spray and blot, spray
and blot.
You want to work quickly after sprinkling on the powders, continuing to spritz the paper with more water and encouraging the colors to move and blend. I like to use a paint brush to help direct the colors into cells.
The longer you allow the ink to sit on the paper the stronger the colors will be, but watch carefully as the colors mix together and blot quickly when they begin to look muddy!
In my experience, no matter what colors you choose, the results are always lovely.
And you can continue to add more pigment powders and activate with more water until you like the results. (or until your paper can't take it any more!! Grin)
The hardest part of this entire process is waiting for the paper to dry. And DO NO USE your heat gun, because if you force dry these pages you will either melt your embossed lines, or they wills start falling off... so Be Patient!
The hardest part of this entire process is waiting for the paper to dry. And DO NO USE your heat gun, because if you force dry these pages you will either melt your embossed lines, or they wills start falling off... so Be Patient!
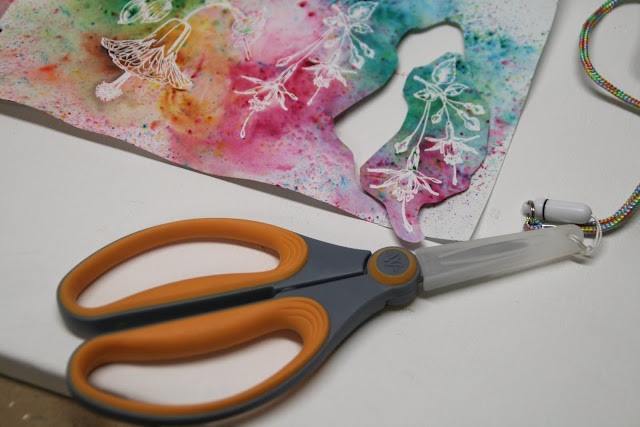
Once the papers are dry you are ready to cut out your colored images. For this step I tried out these scissors from Westcott for fine cutting. I particularly liked the lanyard for wearing them around your neck because for once I could always find my scissors!


I kept my backgrounds simple, using only embossed white card stock and a few foam pop dots to create some dimension, because I really wanted to showcase these beautiful images.
So that's it for today. I hope you enjoyed my little tutorial and now pop on over to the next stop along the way in today's Graciellie Design Blog Hop:
As always, THANK YOU for stopping by to see what I am up to today, and please do leave me a comment if you like what you see!
Lynne Mizera
for the Graciellie Design Team

Graciellie Design/Unity Stamps Used:
 |
| This set is also available in digital format at the Graciellie Design Etsy Shop |
Westcott Products Used:
 |
| Westcott Rotary Trimmer |
 |
| Westcott Scissors |
 |
| Westcott Scissors |


WoW! WoW! WoW! Phenomenal Creation, and great tutorial!
ReplyDeleteSuperb creations!!! Very well explained tutorial too.
ReplyDeleteWow those colours are gorgeous! Beautiful card
ReplyDeleteWOW is really all that is needed to discribe this project.. SOOO beautiful. love it x
ReplyDeleteAnd you did it again! These cards look MAGICAL! Thanks so much Lynne!
ReplyDeleteThe mixture of colors is just gorgeous. Such pretty creations.
ReplyDeleteWow ... what a wonderfully stunning card!!! Love the coloring technique!!
ReplyDeleteOh so beautiful! Thank you for sharing this technique! Love it!
ReplyDeletewow...great visual tutorial...thanx for that!!!
ReplyDeleteThese are beautiful
ReplyDeleteWow!! What a lovely technique! The results are amazing!!
ReplyDeleteWow... amazing coloring for these magical flowers! Love it!
ReplyDeleteAll I can say is WOW I have never tried embossing yet I think it may be something I might like to try
ReplyDeleteSo pretty
ReplyDeleteThanks for the tutorial that shows how you created those beautiful flowers. What a great set.
ReplyDeletewow such a fabulous card... love ur style of coloring it's brilliant
ReplyDeleteGreat colour combinations!
ReplyDeleteOne more big WOW! Your choice of colors just makes these flowers pop. Extremely easy to follow tutorial. Thank you for that.
ReplyDeleteVery pretty and colorful. Thanks for sharing this technique.
ReplyDeleteThis is crazy beautiful! Love how you made these exquisite flowers. Thanks for sharing your technique.
ReplyDeleteYour flowers are beautiful!!!
ReplyDeleteThanks for the tutorial. I am trying this. Your work is amazing.
ReplyDeleteThe flowers on the cards look loke they are alive and ready to jump off the card...very nice
ReplyDeleteOH WOW! Karen, your cards are beautiful.
ReplyDeleteSuch fun cards!! Love them! The flowers look so pretty.
ReplyDeleteLovely technique, Karen. Thanks for the great tutorial.
ReplyDeleteColors pop!
ReplyDeleteLove all the color, beautiful flowers.
ReplyDeleteWhat a great technique!So colorful!
ReplyDeleteWOW,WOW, wonderful card, looking forward to trying this. Beautiful.
ReplyDeleteStunning cards and thank you for the tutorial.
ReplyDeleteOh my gosh so many gorgeous cards!!
ReplyDeleteOh my gosh, so much eye candy. You did some incredible detailing and the colors are fantastic! I am totally inspired!
ReplyDeleteYour coloring technique is amazing!
ReplyDeleteOh my goodness!! Your cards are completely stunning !!
ReplyDelete