Happy Saturday Peeps! Just LOOK at what we have for you today over at the Sisterhood of Snarky Stampers... a Technique Challenge - show us your favorite "resist" technique. How can you RESIST the temptation? Grin
Here is what I created! I did not use any snarky this time because I was right up to my eyebrows in arty, mixed-media creativity. (No, Really - I had product in my eyebrows!) But I did find this awesome quote to go with my 5x7 board canvas... What do you think?
Now as a special treat for all my faithful blog followers and you wonderful people who actually READ the sutff I write, I am sharing with you, in photos, the ENTIRE process of how I got here. Mixed-media is all about adding and taking away and adding back in until that little voice in your head says ... "DONE" - so here is my process and the many faces of this canvas along the way... Enjoy!
 |
| I started by pasting these inky paper towels to my board canvas |
 |
| The flowers were created by using this Art Basics 3D Transparent Gloss Gel and my brand new STAMPlorations stencil "Happy Flowers" to create the Resist in my resist technique. |
 |
| This is what the paste looks like when it is wet, but it will dry absolutely clear so that the color will show through. |
 |
| I painted the background in a wash of water and gesso to fade it back and to make the flowers more prominent. |
 |
| And them because the product was so clear, I applied some Viva Ferro Gold through the stencil to highlight some of the image and then outlined my flowers using a black waterproof ink pen. |
 |
| I used another of my new STAMPlorations stencils "Bubbles-mini" to add some texutre to the background with some white dimentional gel paint from Art Anthology... it is very sublte but leaves a lovely shimmer. (Look at the top left and bottom right corners) | |
 |
| Next I added a border of torn music and dictionary paper and used the "stamping on tissue paper" technique to add the words "Art Your Destiny". |
 |
| and of course it wouldn't be my project without some Bling... grin |
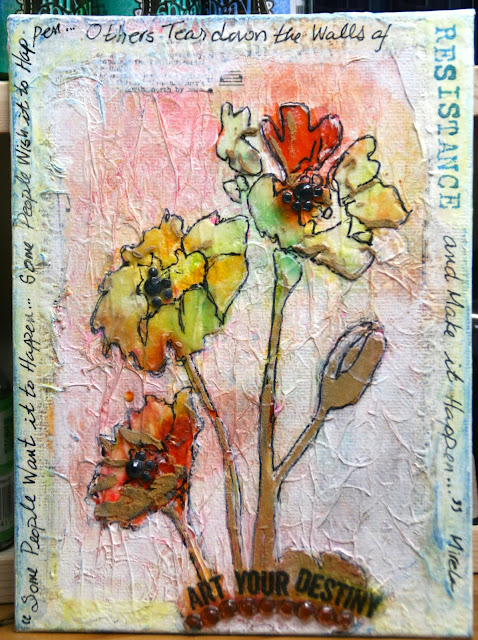 |
| Finally I softened the background even more by brushing on more gesso wash and then wrote in my final quote which really expresses beautifully where I am in my life right now... |
|
"Some People Want it to Happen;
Some People Wish it to Happen;
Others Tear Down the Walls of RESISTANCE
and Make it Happen." Mirela
 |
| Here is a photo of all the products I used for this project... Now why don't you come and show us how YOU Resist! |
Pop on over the Sisterhood of Snarky Stampers to see how my Sisters RESISTED and we would LOVE to see your favorite Resist Technique - You have until August 5th at midnight to link up your project and we always choose a Queen and Princesses of Snark!
As Always, thanks for popping in to see what I am up to these days and please do leave me a comment if you like what you see!
Scrapbooking Artist Lynne Mizera
For the Sisterhood of Snarky Stampers


Ooooooh - waaay cool. I really love this piece. The colours at the start are fab but I did like it too when you gesso'ed it down. I have never heard of that paste stuff you used on the flowers. I am thinking now what I could make that has a resist techky on it :-D
ReplyDeleteThanks for the super details :-D
Hugz
IKE xxx
IKE! Thank you sooo much for the awesome comment... your excitement at discovering a new technique is exactly why I share all my details - to get you inpsired! LOVE IT!!
DeleteGreat! Thanks for sharing!
ReplyDelete
DeleteGlad you liked it Lisa... now go make something OK?
So glad you liked my little canvas Ike... and I would LOVE to see anything you are inspired to create from my little tutorial! Thanks for stopping by...(hugs)
ReplyDeleteTotally Awesome, fab. tutorial and I see more products I might need if I ever get the nerve to try a canvas. But they all look good sitting on my shelf, lol. Beautiful canvas to hang on the wall.
ReplyDeleteWhat a fab canvas, Lynne! I loved the tutorial and the fact that you like to wear your art in your eyebrows too! Thanks for being a super Sistah, it's been a blast being with you guys. Big hugs, Jo x
ReplyDeleteI really need to get my gloss gel out! This looks fabby! Love the colors and the added bling!
ReplyDeleteWhat amazing techniques!!! Love this project and appreciate the step by step. <3
ReplyDeleteJust wow, this is amazing, Lynne! Really appreciate the step-by-step of how you created it, as well.
ReplyDeleteLove seeing that process of how it all comes together ♥ Wonderful!!
ReplyDeleteHugs ♥
I do so enjoy learning new techniques and a big thank you for the fabulous step by step. Glorious project and a big thank you for the wonderful inspiration. Thank you for finding time to stop by my blog and leave such kind comments...I used ordinary bleach on my tag diluted with water to remove some ink but next time I will water it down even more as the tag underneath was ivory and now even that went white...which in this case was no bad thing...but maybe not next time! xx
ReplyDeleteThat is absolutely gorgeous. Love all the techniques that you showed.
ReplyDeleteThis is sooooooo gorgeous Lynne! Thanks for your step by step tutorial (you make it look so easy!) And I love the fact that you wear your supplies in you eyebrows! LOL!
ReplyDeleteWhat a gorgeous canvas!! You rocked it sistah!!
ReplyDeleteHopefully your eyebrows didn't sustain too much damage in the creative process.
The sacrifices we make for our art (he he he)
This is AWESOME!!! Thanks for sharing the tutorial using all the different mixed media bits & bobs.
ReplyDelete