Please Respect My Work...

All of the cards, layouts, handmade items and art work displayed on this website are copyright to me, Lynne Mizera. Of course I hope to inspire and encourage you and would be morethan happy for you to use any of my work to that end; however, please respect me and my work and do not directly copy any of my projects without crediting me or enter any of my work into any magazines or competitions without my express written permission. All my cards, layouts, projects and art work are not to be used by any commercial enterprise for any financial, marketing or commercial gain.

Monday, December 24, 2012

My "Mother Heart" is Full...

Merry Christmas EVE 2012 and I hope you all are having an AMAZING Day!  I wanted to share with you this Christmas Eve how proud I am of my grown-up daughter, Donna.... Being a Mother is a complicated thing... not just the "being" but the crazy quilt of emotions that go along with it... and if you think that these emotions go away after your children grow up and move out... your would be WRONG!  
Last year when my grown-up daughter surprised me with a gift of "family" by flying in her brother and his new family so we could all be together for Christmas for the first time in over 10 years I thought my heart was full... But when I came into the kitchen that Christmas Eve to see her beaming in front of our traditional Christmas Eve Appetizer spread.... which she pulled together all on her own.... (Looking like a little "Mini-Me" GRIN)... I thought My heart would BURST!  And for me THIS is what Christmas is all about... Food, Family and LOTS of laughing. 

I used the myStamp Box Sigh Gush Gasp stamp set to whip up this layout and I want to share a couple of tips with you:  I actually made a "frame" with my stamps on a large stamp block rather than try to line up each word individually... which allowed  me to space and center my words perfectly before I stamped.  It also allowed me to stamp them all at once so I could then use white embossing powder and my heat gun to really make those words pop.


And another little trick of mine ... I now use my copic markers to edge my photos and mats instead of ink... It is quicker, easier and less messy; it dries instantly and I have EVERY color at my fingertips!  And I especially love the look of a photo edged in black. 

MERRY, MERRY CHRISTMAS Everyone!
May your Holiday be filled with Food, Family and Lots of Laughter


Monday, December 17, 2012

Sweet Treats Just in Time for the Holidays...

I wanted to share with you how I make a simple homemade Christmas treat into something just a little more special by adding a handmade Gift Tag.  It is an easy way to quickly dress up a holiday gift and I find that adding these tags turn these simple, homey gifts into a personal labor of love.  

I created all these tags using the myStamp Box HoHoHo and Happy Birthday sets and an easy to do ink-resist technique.


First I colored my tag using Ranger's Distress Inks in a light coating of red and green, you want your base ink color to be lighter than the final color you will be using.  Use a heatgun to ensure your tag is completely dry before you start your stamping for the embossing portion.   Once the ink was dry I frist stamped and embossed the HoHoHo with a white embossing powder; I then stamped and embossed the Jingle Bells useing a clear embossing powder.  At this point the sentiments are still a little faded out so I intensified the red and green colors by coloring over the tag with my Ranger distress stain, but if you don't have any stain you can use your original distress ink colors to add more layers and intesify the color.  Any stain (or ink) that gets onto your emobssed words can be rubbed off using a soft cloth or paper towl as the embossing resists the ink (hence the INK RESIST technique) and now my words POP right off the tag!

For this tag with the gifts I used only a clear embossing powder over a yellow and red base.. you can see that the background wording is more subtle here... Also, I LOVE that these gift images are from the myStamp Box Happy Birthday stamp set, but since it's a Christmas tag you can't really tell.

I created this tag from the Happy Birthday stamp set as well, and this tag was so quick and easy I know I am going to do this again!  I inked my tag using three colors of distress ink and dried it with my heatgun.  Then starting at the bottom, I stamped each line in a watermark ink and embossed using a white emossing powder.  I decorated the candles and gift images using different colored stickles  and what a cute little tag it is!


Now to create this look I again inked my tag using two colors of Ranger distress ink and then covered the entire tag in a very thin coat of metalic silver paint so the ink still showed thorough.  I stamped and embossed the sentiment in a very black sparkly embossing powder and added a piece of paper ribbon.  I stamped, colored and cut out the myStamp Box images and used popdots to adhere them to the tag.  A finishing of stickles and CTMH Liquid Glass and it's done!  I used the pearl stickles on Santa's Beard and Liquid Glass on his boots and belts.

I hope these cute little tags will give you the inspiration to create your own!


Monday, December 10, 2012

It's Christmas Card Time...


  I LOVE making and sending Christmas cards, no I really do!
 
I fell in LOVE with this window frame die this year...
This is my Dr. Seuss Christmas Tree using a Quickutz die

I start in the summer when I am camping (yup! I can craft in my trailer... GRIN) We head out for a week of camping in May and I start making cards... I have so many ideas and so much product that once the momentum starts I cannot stop it.  This year since I have had more free time on my hands than I have ever had I made (and sent) 120 cards (and still counting)!

 
I Also LOVE to fussy cut... hence the pine branches

It has gone out of fashion - sending Christmas cards - although people still love receiving them.   But as people's Christmas lists grow to gargantuan proportions this it the one task that is easy to cut - and I do understand the pointlessness of scribbling your name on the bottom of a stock card just to say you sent one - but for me my Christmas cards are a labor of love.  

I used some none-traditional paper for this card...Susan K. Weckesser's Live, Dream, Create line... lovely isn't it!
This card was created from three unrelated stamps by different companies... I think cats are HILARIOUS!
I don't make them in expectation of receiving anything in return, or in competition with all the other "Type A's" out there (grin), but I make them as a gift that I give to my friends and family and people who have touched my life in the past year.... it is gift of time and love and each card is unique and individual, just like the people I send them to.

My new Favorite Snowman stamp... by Susan K. Weckesser and Unity Stamps
You don't have to re-invent the wheel, I found this lovely Christmas tree image and popped it behind that window die...

Now I have so many Cyber friends it would be impossible for me to send each and every one of you a card so I am posting a selection of some of my favorite cards for you to enjoy... And please feel free to copy or share any of my card ideas, but I would love if you remember to give ME the credit!

Merry Christmas 2012... From Scrapbook Lynne

A Little Christmas Gift Bag...


This Christmas season I have made a commitment to using up some of my collection of gift bags.
I don’t know about you but I have accumulated a huge number of them over the past few years, but every time I need one I don’t seem to have either the right size or the correct event and off I go to buy yet another gift bag! So using the myStamp Box stamp set HOHOHO I altered these three "Wine bags" into three mini Christmas gift bags!  It is a quick and easy way to make that gift just a little more personal AND use up something you have on hand.

So why not stop by the myStamp Box Blog to see just how I created these little lovelies!

Wednesday, November 28, 2012

Some Homegrown Love on the Home Front...


Home and family has been much in my thoughts lately as it always is during the Christmas season, and this year I feel especially blessed to be a part of the  Susan K. Weckesser DT Family and the Christmas Love Campaign... an Idea I Totally Agree with.... Share the LOVE!  (check out Christmas Love Campaign Details here)
 

So for my Guest Designer Post for the Susan K. Weckesser Design Team this month I wanted to "share the love" I have been feeling and created a card that is a bit different than my usual style.  I want the person who receives this card to feel like they are sitting in a lovely, warm room looking out onto a cold and frosty but sunny winter day... and life is good!  Please go to Susan's Blog to see how I created this little gem and let me know what you think!

Thursday, November 22, 2012

It's a GLORIOUS Morning!

Happy American Thanksgiving to all my friends in the United States!  And in celebration of this day I want to share a layout that is very close to my heart - Every morning I wake up before the sunrise... not on purpose, that is just my internal clock... and I make a cup of coffee and stand outside on my back deck and watch the sun rise over the ridge.  No matter what else is happening in my life this morning ritual allows me to have some perspective and helps me to be thankful for the "little things" that somehow always seem to become the BIG things.

I used myStamp Box stamps Enjoy Your Latte and Sigh, Gush, Gasp to create this layout, and pages from Canvas Corp's new kraft line, Coffee Words on Kraft, Chocolate & Kraft Mini Dot Reversed and Chocolate & Kraft Swirl Reversed.  For more ideas celebrating family and home please go visit the myStamp Box Blog to see what myStamp Box design team members have created for today.

Monday, November 19, 2012

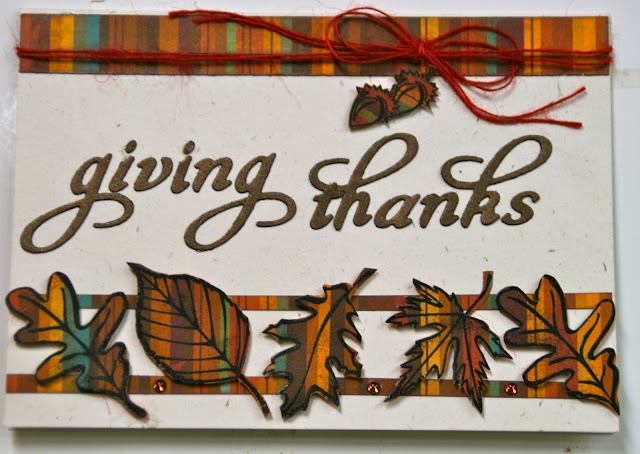
a THANKS-Giving Moment....


I guess with the American Thanksgiving holiday just around the corner and the last of the leaves dropping off the trees,  being thankful has been on my brain a lot.  This year I have discovered that the more grateful and thankful I feel about the life I have RIGHT NOW, no matter what the circumstances, the more good things seem to arrive into my life.  It could be something as simple as people being nice to me all day or as amazing as unexpected gifts of things and money... but the key is to be truly, deeply, "heartfelt" thankful for all that I have in this moment.

So with all that in mind I went a little crazy when with the myStampBOX Floating Leaves stamp set I just received because not only is it a lovely set, it is also very versatile.  I made cards, tags, and a layout each using a different technique. You can see everything I made on my very first post at the myStampBOX Design Team Blog so why not stop by and "Leaf" me some love... Grin!

I stamped and embossed the leaves on Basic Grey patterned paper, then fussy cut and arranged on a card using foam popdots to add dimension.  I "die cut" my sentiment using my Quickutz Harvest font, but any stickers will do, and a few dew drops and a bit of hairy fiber finshed it all off... a simple, elegant Thanksgiving card!


Monday, October 29, 2012

Sometimes Life Gets Messy... So why not Wear an Apron!

I'm a JUST DO IT kinda girl and I am MESSY when I am doing it! It doesn't matter whether I am in the kitchen, in the garden or playing in my studio, when I am immersed in the creative process - trying to scratch that idea out of my head and make it take some kind of tangible shape - I just DON'T CARE about my clothes!  And there came a day when I realized that every piece of clothing I owned (that wasn't a dress) was stained with either dirt, or food or ink or paint!  So out of sheer necessity I started to wear aprons - at first just to protect my clothes, but then they became a kind of uniform that said, "Don't mess with me right now.. I am WORKING!"

Working in my Garden.. Yes, that's what I wear!
But why oh WHY do working aprons have to be so Ugly!  I know you can find cute little aprons with ruffles and bows that look like little Audrey Hepburn dresses, but I don't have that 1950's housewife body with the tiny little waist that you need to really pull off that look.  Plus I need a BIG apron... a WORKING apron - one that covers me from neck to knees and goes all the way around!  But let's face it those aprons are all UGLY, and I still want to look good when I am working, so what to do?  I don't own a sewing machine and stitching by hand is just too much work to put into an apron that will end up being stained and "well used"!  So I was at a loss until one day, by total accident, I discovered that you can color on fabric using Copic markers!  You can even shade and layer colors and add dimension! AND if you heat set your work with a hot iron, you can wash it too -  WHO KNEW!  So I have been playing around with coloring my aprons.  First free-hand, but then I tried stamping my apron with a pattern of images and then doing the coloring - Fast-Easy-and PRETTY!

So ... Here it is being revealed for the first time... 
A new Stamped & Colored Apron created by Me... 
and my first project as Guest Designer for the Susan K. Weckesser Design Team using the stamp set "Poised and Pretty" by Unity Stamps:

For detailed instructions on how I created this apron please go to the Susan K. Weckesser DT blog
Christine modeling my newApron

The details


Don't you just LOVE the shading!!!


Life is GOOD!

Well, it's official... effective November 1st I am on the myStamp Box Design Team (Big GIANT Smile!) and I cannot WAIT to share with you all my ideas for the things you can do with the stamps from this wonderful Canadian company!  My first "official" post will not be released until the November 1st reveal on their blog but I want to give you a little "sneak peak" into one of the projects that I have been working on: (Shhhhhh - don't tell - grin)

 Here's the birthday card I created for a dear friend whose birthday was yesterday...

Happy Birthday Tanya.... GRIN!
I used the new "Floating Leaves" stamp set from myStamp Box and just heat embossed the images using a bronze embossing powder on an autumn colored patterned paper from Basic Grey - No coloring required - then cut them out, layered, popped and glued... DONE!
Now Enjoy!

Sunday, October 14, 2012

A Little "Christmas Love"...

I just had to share a wonderful event that is the brainchild of Susan K. Weckesser:

 
The basic idea is that you "spread some love" by crafting something - ANYTHING - and then you share it with someone - anyone - even a total stranger! After which you upload a photo and/or post about your experience on Susan's blog.  And as if that's not enough, you are then entered into the random draws that Susan makes over a 2 1/2 month period.  It has really taken off over the past couple of years and there is even a badge that you can grab for your own blog if you participate ( I LOVE that!).   And now along with Susan's own amazing line of products, prizes are now being provided by other people and companies as more and more people  "Share the LOVE".  Check out this amazing offer from Unity Stamps for this year's campaign... 


So I encourage you to check it out, the stories are heartwarming and they are coming in from all over the world.  Personally I love how it helps us all to feel connected in a very personal and touching way, so WHY NOT join in on the fun and maybe help to brighten up some one's day...SMILE!

Monday, October 1, 2012

A Brand New Adventure for me....

I am tickled PINK to share my newest adventure with all of you...


I have LOVED Susan Weckesser's amazing creations ever since I was first introduced to them back in 2010 when she was SuzieBee Studios, but I also admire her as an artist and as a genuinely warm and caring person.  It is a joy to watch her living her dream of being a full-time artist while raising and supporting her family ... so to be selected to be a Guest Designer for her first ever design team feels like Christmas Morning!  

Here are some cards that I created with one of her new Unity stamp sets and I cannot wait to share more with you, so stay tuned!

Friday, September 28, 2012

Send (or be) an Unexpected Gift


Have you ever noticed that when you are going through something really hard, or really dark how it is the smallest, unexpected act of kindness that gives you the strength and courage to keep going?  I have been reflecting upon some pretty rough times in my distant past when I started to remember that there were a handful of times when I felt like I REALLY couldn’t go on, and then a card would appear in the mail or the phone would ring out of the blue and someone would take me to lunch and spend an hour of their life just listening to me!  And why this had such an impact on me was because IT WAS NEVER FAMILY or even close friends, but usually someone that I had met briefly or casually or someone who had heard about my situation through someone else… which is why I still remember all of them - these  almost Strangers who took time out of their busy lives to send me some kindness.   I wish I had paid more attention at the time and expressed how their one act of kindness felt like a lifeline at the time!  But Shoulda….Woulda…. Coulda….. I can’t change the past but I can do something now.

I am currently immersed in my Brave Girls Art School on-line classes


Doodling Funk Flowers - Brave Girls Art School - Lesson 1
and last week we were given an assignment of creating a 3-D collaged flower garden and sending it to someone who is not expecting it and may need a little joy in their lives. (I guess that is what got me thinking about all those times I received unexpected gifts of love and kindness) and I thought WHO can I make this for?  And the name “Dawn” immediately popped into my head!

Dawn's Garden
I met Dawn briefly in June At a women’s empowerment retreat I go to every year called "Scrapbook Your Heart".  A talented and generous soul, she has spent the last 20 years of her life in service to others – especially children. Dawn had made each of us at the retreat a personal journal – there were 80 of us! And each journal was an original, individual work from her heart… EIGHTY OF THEM!  We all cried when we received our gifts, every single one of us!  And then it was announced that she was off to the States the following week to undergo some experimental treatment for the Big “C”.  She did NOT want to be singled out, she was uncomfortable with our thanks, but her journals were a gift to us of how powerful journaling can be in everyone’s life, and her journal to me gave me another little push along the road to recovery and forgiveness that we all walk one way or anther. 

I LOVE my Journal -  it says "The world will tell you that happiness comes from more, bigger, better, newer.  Find out FOR YOURSELF if this is true... when you find the truth, lovely you, be brave enough to live that truth."
 So my Garden goes to Dawn… it is in the mail today…. And I send it with love and prayers and hope that it will give her a little light and joy, and let her know that she matters, she is thought of often and she has made an impact on my life.

And so I encourage you to give in to that little voice/thought/nudge that says “you should call her.” Or when you see a card that would be PERFECT for someone… don’t draw back, thinking it is too personal, or you don’t know them well enough… because they may need just that … a little joy or kindness from an almost stranger!

Tuesday, September 25, 2012

A Gratitude Adjustment

Well, so much for my promise of regular blogs (guilty smile)… but really what a ride the last five months have been!  In May just after I turned 50 an amazing book came into my life titled “The Magic” by Rhonda Byrne and it started me on a journey of daily gratitude and joy!  I start every morning being truly thankful and grateful for the amazingness of my life today (no matter what is happening – smile) and I end every day with a quick review of all that happened that day, choosing the one thing that was my favorite, BEST moment of the day and saying a quick “thank you" for that moment before I fall asleep! and you know what... Life just keeps getting BETTER and BETTER these days and even the "hard moments are joyful!
Birthday Flowers from My Sister-in-Law!
In June I attended a five-day Brave Girls Camp hosted by Melody Ross and her sister Kathy Wilkins in Star, Idaho.  Imagine, Empowerment and healing through ART! It was LIFE CHANGING! 
Melody, Me and Kathy

Our Group... I MISS YOU GUYS!
Me at my art table in Star, Idaho (see the stars?)
In July my amazing grandboys (who are 8 & 5) arrived for a 35-day visit -woo hoo!  I spent the month of August RECOVERING from the 35-day visit!  (it was totally worth it though!)


My Boys (Charlie's Angels?)
and this is what it was like most days!! LOL
In September I started Brave Girls Art School and discovered my Inner Artist and my life has changed YET AGAIN! 
Brave Girls Art School Lesson 1 - doodled Funky Flowers...WHO KNEW!
And as I reflect back upon the past few months I have to share with you that life has taken on a very rosy glow since I started focusing on all I HAVE in my life instead of moaning about all I don't have in my life.... I call it a GRATITUDE ADJUSTMENT and I encourage you to give it a try!

Monday, April 30, 2012

To My Amazing Daughter!

CONGRATULATIONS to My Lovely Daughter Who is writing her final exam this morning for her Real Estate Licence!  What an amazing accomplishment in such a short time.. I KNEW you could do it!

The inspiration for this card I created for my daughter came from the Beyond Grey Challenges site I just discovered... They are a group out of India and I am looking forward to sharing with them! (Don't you just love how small the world has gotten with this World Wide Web?!)

  The challenge was to create a simple card using chipboard and ribbon... I used some one-inch wide satin ribbon; a Harmonie ribbon slide which I painted silver using Ranger's dauber paint and then cut in two; four jewels as accents; and then I stamped and embossed (in silver of course) the words.  
That's It! Simple and Elegant - Just like my daughter!
Enjoy!


Thursday, April 26, 2012

It's a BLOG HOP! Presenting the CMS STEAMPUNK Release

Welcome Friends to our FIRST EVER Copic Marker Scrapbooking Blog Hop!  If you are currently "hopping" this should be your 9th hop and the letter you need is "I"

If you have just stumbled in and WANT to join our hop go to the Making our Mark blog to start.  Every person completing the hop will receive the entire Steampunk Digital Stamp set FOR FREE! AND one lucky hopper (randomly selected) will receive the Copic Sketch Set Ex-6 - which is a set of all the new Copic colors!

Hopping Instructions:  Starting with the Making Our Mark site you will hop through all the blogs of our Design Team and one Guest Designer, collecting a LETTER and leaving some blogging LOVE (a comment) at each site.  While you are visiting you will get to see what our amazingly creative and talented team did with the newest Copic Marker Scrapbooking digital stamp: STEAMPUNK (Designed by our own DT Leader - Colleen Heron!)   When you have visited all the sites your collected letters will form a "secret word" that you need to e-mail to hurricaneheron@gmail.com and if you have the correct word you will be sent the complete Steampunk digital stamp set to play with however you like!  This hop is active only until Midnight April 29th so don't wait... come and play!

Now here are my takes on the Steampunk release:
When I saw these two "young people" images I knew I just had to scrap a layout of my grandson Aidan and his best friend Sophie. She is the "older woman" being 9 to his 8 and is the centre of his world (just look at how he LOOKS when he is with her.)  Sophie is an independent, creative and very, very smart young lady who has NO fear and is the first to come up with another great creative play idea.  And while Aidan is also very imaginative and very smart he tends to be the more analytical of the two and he plays a more supporting role in their relationship.  I love watching them together and I just love how these two Steampunk images captured my vision of their two personalities. 

To add more dimention to a layout I like to pop my images off the page

For my tag I wanted to create a more whimsical feel.  Using my Tim Holtz embossing folder and Ranger's sky blue dauber ink for the background, I rubbed a slightly darker ink over the embossing; I then popped my SteamPunk Hot Air Balloon images off the tag and added whatever "goodies" I had on hand in the Scrap Basket I keep on my counter in my studio.  My secret to this technique is DON'T OVERTHINK - If you like it - just glue the stuff down! and of course the finishing touch - highlight with a little stickles and liquid glass!


For my card I used one of my favorite "quickie card" techniques... again using Ranger's stickles I decorated the heck out of this dragonfly paper and then I popped my Copic Marker Scrapbooking Steampunk image off the card to add some dimension; a stamped word and some liquid glass and I'm done... Quick, fun and unexpectedly original!
And last but not least - here is OWL... I haven't done anything with him yet, but he is just soooo cool I HAD to share him...


Well THANK YOU for Hopping by!  Now don't forget to leave me some Blogging Love (a comment) and then HOP over to Peggy's blog: My Stamping Obsession for your next letter!
(NOTE:  if you get lost on the hop you can find a listing of all the DT blogs to the left of my post)