Please Respect My Work...

All of the cards, layouts, handmade items and art work displayed on this website are copyright to me, Lynne Mizera. Of course I hope to inspire and encourage you and would be morethan happy for you to use any of my work to that end; however, please respect me and my work and do not directly copy any of my projects without crediting me or enter any of my work into any magazines or competitions without my express written permission. All my cards, layouts, projects and art work are not to be used by any commercial enterprise for any financial, marketing or commercial gain.

Monday, March 20, 2017

"Dream Big" - Creating Tags Using Some Mixed Media Techniques and Magenta Pigment Powders

Hello and Happy Spring everyone!  For my mixed media tutorial this month over at STAMPlorations I thought I would share with you how to create these colorful spring-like tags using only two stencils, one stamp set and the STAMPlorations Nesting Luggage Tag die.
Today you will be experiencing two lessons in one as I share first how to create these lovely mixed media backgrounds using your stencils and then how to use a stamp and a heat embossing technique to create these lovely works of watercolor art using pigment powders. So let's get started!
I started with two tags cut with the largest Luggage Tag die from pieces of heavy card stock I had sprayed with Dylusions Inks.  First I applied some Dreamweaver gold metallic embossing paste through the ARTplorations Circular Two stencil over top the orange tag, then, without cleaning my pallet knife I applied some Dreamweaver black glossy embossing paste through the ARTplorations Square City stencil over top the colorful tag.
Can you see how the gold paste blended with the black paste to create this lovely effect?  I added even more gold paste over top of the black paste before I lifted my stencil.  And did you notice how the black and gold pastes changed the entire look of the original tag from bright and fun to muted and sophisticated... Cool Huh?!  Now while these are drying let's go play with the Pigment Powders!
I am using my Nuance pigment powders by Magenta but you can use any of these products, Brushos, Ken Oliver Color Bursts, ColorArte's Primary Elements, whatever you have on hand.  I like my Nuance pigment powders because they contain more than one color pigment in each pot and I get a bigger effect in only one step.
For this technique I am using the new STAMPlorations Hope Blooms stamp set and 140lbs watercolor paper.  I am stamping it with clear embossing ink, sprinkling it with Stampendous white glossy enamel embossing powder and setting it with my heat gun.
For this next step have the colors you want to use ready... I am using Purple and Aquamarine for the blue set and Golden Yellow and Nutmeg with a hint of Purple for the orange set.  First spray your stamped paper with a heavy layer of water, enough so that the water pools in the cells created by the embossing powder...
Now gently sprinkle your first color onto each stamp  - start with your lightest color and add it like you are sprinkling on salt - only a little bit at a time, you can add more color later - now count to 20 and watch as the powders activate, mix and swirl... Note: If this does not happen - Spray on more water!
Now add your second color and spray your paper again with more water until you get pools of color like this... again count to 20 and then blot off all the excess with a roll of paper towels.
Just roll the entire paper towel roll over top of your paper.... the longer you wait to do this the darker your colors will be... so maybe count to 50!  Grin
You can use a paint brush to help direct the color into areas that don't have any and also to blend and mix colors... don't worry about it being too dark or too bright because once you blot off the excess the color becomes a lot lighter...
Notice how I let the complimentary colors of purple and orange touch but did not let them blend... complimentary colors make each other look better, but do not blend well together...
Also, notice how I stamped multiple images of each stamp and each color group had it's own page of multiple images, this is because you cannot really control this process the more images you have the better chance you will end up with one you really like. Once the paper has dried you can cut out your favorite images and assemble them onto the tag base you created earlier...
I left some images whole and cut out pieces from others...


Notice how this lightly colored, blue butterfly totally pops against the complimentary oranges and golds?

So a whole lot of mixed media fun in this month's project!  I hope this inspires you  to go play with your stencils and if you do ... don't forget to link up to our March Mixed Media Challenge over at STAMPlorations where it's always Anything Goes Except a Card as long as you use a stencil... any brand.  The design team always picks a winner and there are prizes to be won!
Prizes:
- $10 gift certificate to the winner voted by the Mixed Media team
- $5 gift certificate each to the 2 top picks
- If there are 25 or more entries: 1 random winner of any 2 standard size stencils

Thanks for popping in today to see what I am up to and please do leave me a comment if you like what you are seeing! (hugs)
Lynne Mizera, Mixed Media Artist
for the STAMPlorations Mixed Media Design Team


STAMPlorations Products used on this project:
Note: Use my Personal Discount Code to get 20% off all stamps, stencils and dies at STAMPlorations (even sale items!):
NESTING LUGGAGE TAG DIES
SQUARE CITY STENCIL

CIRCULAR TWO STENCIL
HOPE BLOOMS STAMP SET
Other products Used on This Project:
Magenta Nuance Pigment Powders
Stampendous Dreamweaver Glossy Black Embossing Paste
Stampendous Dreamweaver Gold Metallic Embossing Paste
Stampendous Glossy White Enamel Embossing Powder 

Sunday, March 19, 2017

Using Your Stencils With Metal - Who Knew!


Happy Stencil Sunday Everyone! Today is another day of inspiration over at the STAMPlorations Blog and I am excited to be sharing with you a different way to use your STAMPlorations' stencils by creating embossed images using some soft pewter metal and a paper stump and metal stylus to create beautiful 3-D images which you then use to embellish anything.  I used mine to embellish this tiny wooden box I picked up at my local dollar store for under a dollar, but now looks like a miniature work of art.


I first covered my box in a layer of Aquamarine Inka-Gold paint, and once the paint had dried, burnished the box to make the paint go all shiny and metallic looking. 
Then, to create the embossed images I placed a piece of soft pewter metal underneath my stencil of choice and on top of a pad of paper to create a firm yet flexible surface to work on.  Then using a paper stump I gently outlined and filled in the stencil image - just like I was coloring it.  You will note that I did use some painters tape to make sure the metal did not move under the stencil while I was burnishing it.
When I turned the metal over my image looked like this.  But then to really make my it pop I gently outlined the dragonfly from the front using a metal stylus with the smallest ball.  (If you don't have a metal stylus you can use a slightly dull pencil to get the same effect.)
I then used a some texture wheels I have for metal embossing to create the textured border and scribbled all over the top with my stylus to create an interesting design. This rectangle is going on the lid of my box...
...but I create several other dragon flies which I cut out and applied to the front and sides using Sookwang double sided tape to adhere them to the box.  I just applied the finished metal piece to a wide strip of Sookwang tape and then cut out each image and applied it to the box...

I used the scraps to create some leaves and vines to fill in the blank spaces...
And if you really want to make your box special (which I did) glue a piece of two-inch wide, velvet ribbon to the inside so that when you open the lid it really does look like a tiny jewellery box... Swoon!

I hope my little project inspires you to go play with your stencils and if you do, don't forget to link up to our March Mixed Media Challenge over at STAMPlorations where it's always Anything Goes Except a Card as long as you use a stencil... any brand.  The design team always picks a winner and there are prizes to be won!
Prizes:
- $10 gift certificate to the winner voted by the Mixed Media team
- $5 gift certificate each to the 2 top picks
- If there are 25 or more entries: 1 random winner of any 2 standard size stencils

Thanks for popping in today to see what I am up to and do pop over the STAMPlorations blog to see what my design teammates created for you today.  And stay tuned for some really interesting and fun blog posts coming this way soon!
Lynne Mizera, Mixed Media Artist
for the STAMPlorations Mixed Media Design Team

STAMPlorations Products used on this project:
DRAGON FLY WALTZ

Note: Use my Personal Discount Code to get 20% off all stamps, stencils and dies at STAMPlorations (even sale items!):

For more information about soft metal embossing and for video tutorials and supplies go to:
In Canada:
Pewter Art - Elitia Hart (She taught me everything I know!)
In the USA:
Ten Second Studios - tools
Ten Second Studios - How To Videos

Other Items used on this project:
Ten Second Studio Metal Embossing Basic Tool Set - Canada
Ten Second Studio Metal Embossing Basic Tool Set - USA
Inka-Gold - Ultramarine
Sookwang 2" wide Double Sided Tape
Velvet Ribbon - 2" wide

Sunday, March 5, 2017

LIfe is Good ART - An Art Journalling Journey


Hello and Happy Sunday!  For today's Stencil Sunday over at STAMPlorations I want to share this Art Journal page I created for myself about the direction I want to take my life this year...
I cannot find words big enough to express how scary this is... to say out loud to the world "I Am An Artist"... but here it is in words that are big and in colors that are LOUD... just like me! Grin  
So stay tuned for some very interesting and informative blog posts where I will be sharing in words and photos what I have been up to these past nine weeks and revealing what I hope to accomplish over the next few months... it's pretty AWESOME! 

Now for those of you that want to know, here is how this page came together .... 
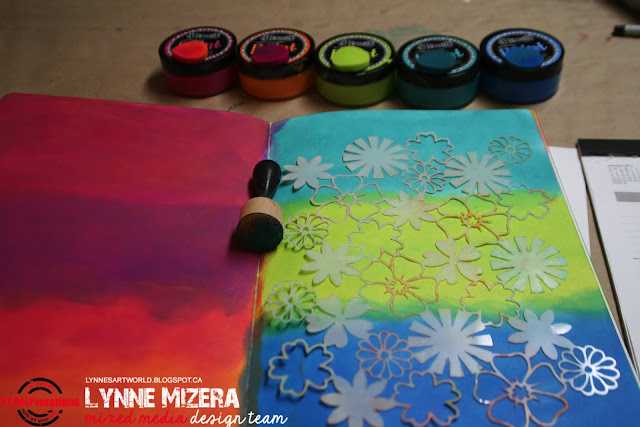
I started with a layer of Ranger Dylusion paints applied using a foam applicator after watching this Youtube video by Dyan Reaveley.
I used the Large Bloom Factory stencil and pounced white Dylusions paint overtop to create this luscious background.
And I used the Life is Good and ART Happens masks to create the wording on the bottom of the page.
See how wonderful these pages look after the white paint dried.  Using only one layer of white paint softens the original colors and gives the background so much depth and interest.
And my final step was to add the message to myself I needed to hear and to create doodles and marks using my black and white pens.
I may add more to these pages over time but my Art journal did its job for now, allowing me to hear the message I need to absorb into my soul at this moment...
And life IS good right now...

And as this is the first Sunday of the month it is also the start of a new Mixed Media Challenge over at STAMPlorations where it's always Anything Goes Except a Card as long as you use a stencil... any brand.  The design team always picks a winner and there are prizes to be won!

Prizes:
- $10 gift certificate to the winner voted by the Mixed Media team
- $5 gift certificate each to the 2 top picks
- If there are 25 or more entries: 1 random winner of any 2 standard size stencils


Thanks for popping in today to see what I am up to and stay tuned for some really interesting and fun blog posts coming this way soon!
Lynne Mizera, Mixed Media Artist
for the STAMPlorations Mixed Media Design Team

STAMPlorations Products used on this project:
ART Happens - Mask
Big Bloom Factory - Large
Life is Good - Mask