Please Respect My Work...

All of the cards, layouts, handmade items and art work displayed on this website are copyright to me, Lynne Mizera. Of course I hope to inspire and encourage you and would be morethan happy for you to use any of my work to that end; however, please respect me and my work and do not directly copy any of my projects without crediting me or enter any of my work into any magazines or competitions without my express written permission. All my cards, layouts, projects and art work are not to be used by any commercial enterprise for any financial, marketing or commercial gain.

Saturday, September 29, 2018

Lynne's ART World - I Am Back With A New Purpose and HUGE Creative Energy To Share...

Hello Peeps!  I beg your forgiveness and thank you for still being here as it has been four months since my last blog post. (gulp)  But my time has not been wasted as I have been BUSY behind the scenes re-focusing my art direction and honing my skills as a mixed media artist, and I am now ready (and excited) to share just a few of the amazing pieces I have been creating.
Me in my Studio playing with Pebeo Moon and Fantasy paints

In January of this year I took a long look at my blog and realized that over the past few years, because of my design team work, my blog had morphed into more of an advertisement for product rather than the inspiring and creative space I want it to be.
Mixed Media on 10" Stretched Canvas
So I decided to change my direction and slowly began resigning from all my design team positions, where the focus is on product rather than creativity, and began focusing on my art and my creative process.
Painting With Fibre - 2-D Needle Felted Faces

But of course, design team duties gave me deadlines that I had to meet and made me create regular blog posts for all of you - and without those deadlines I procrastinate (don't we all?) but after today that is going to change!
18x24" Mixed Media & Collage on stretched canvas
Those of you that have met me know that I love to teach and share my knowledge as much as I love to create and my tutorial blogs are some of my very favorite posts, so you can expect to see more regular posts, more of my art and more photo tutorials as well as (hopefully) a video or two - I am still struggling with all the technical STUFF - but I am so stinking CUTE on film that you need to see me...Grin.
12x12" Mixed Media on Stretched Canvas (Inspired by Jenny Grant)
These past nine months I have been literally up to my elbows in paper and paint and ink and pastes and fibre and glass! 
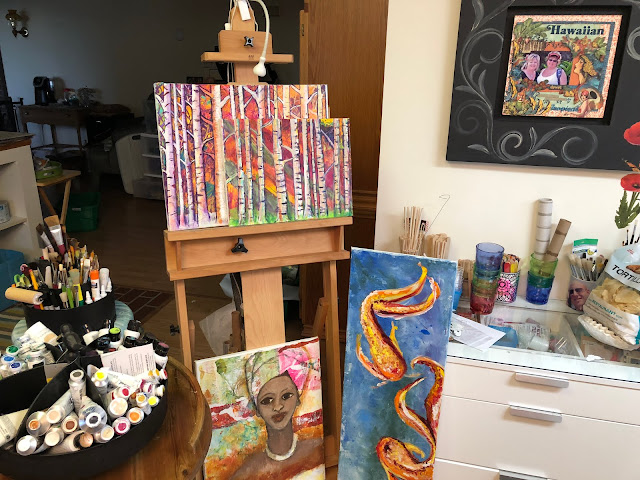
On My Easle - Some of my Works In Progress
And I have been developing a new passion - Needle Felting and Wet Felting Fibre Art, as well as working on canvasses and cards and taking lessons and lessons and lessons.
Making My Own Scrapbook Paper
 
Me In A Needle Felting Class At The Winery - The ONLY way to learn!
The days are just not long enough for all of my cretive passions and the energy created as I work has me up before the birds to spend 12 or more hours a day in my studio space.

A New Passion - Miniatures - Harry Potter School Chests
So stay tuned for more and regular posts from me, and as always, Please DO leave me a comment if you like what you are seeing.  (and of course suggestions on WHAT you would like to see are always welcome!)


Happy ARTING!
Lynne Mizera, Mixed Media Artist
Creston, BC Canada

Follow Me on Facebook: https://www.facebook.com/scrapbooklynne
My Instagram:  https://www.instagram.com/lynnemizera/


Wednesday, June 6, 2018

Some Of My Favorite STAMPlorations Things And The STAMPlorations 5th Anniversary BIRTHDAY PARTY!

Hello and Happy Day Everyone! Today I am excited to be the featured designer for the STAMPlorations' 5th Anniversary Birthday Party event  - a month-long celebration that includes loads of inspiration, huge sales and lots of prizes!  In this post I am hoping to inspire you by sharing some of my very favorite projects and posts from the past two years of creating for the mixed media design team, as well as sharing several new items I created using one of my very favorite stamping techniques, because for all of this  month, for every designer's project you CASE (Copy And Share with Everyone) you will receive  more chances to win stuff!  (Go HERE for all the details)  ... So, in no particular order, Here They Are:

Pick No. 1:  Pretty Storage Containers... I used empty tins from the recycle box to create pretty storage for my Art Space... Using the new Bloomtangled Cover Plate #1... Go HERE to See how I made these.


Pick No. 2:  Mixed Media Canvas... this is just one of the many mixed media canvases I have created over the past two years on my team... go HERE for a step-by-step tutorial on how to use stencils, masks and stamps to create a beautiful one-of-a-kind art piece of your own:


Pick No. 3:  Gift Tags I created using one of my very favorite stamping techniques involving heat embossing and watercolors.  Go HERE for my in depth "How To" tutorial.

https://blogger.googleusercontent.com/img/b/R29vZ2xl/AVvXsEjUCSOtuKy5crvR7urOTFvAJxV1IEqbVKdTwNH4B7YXGqowE6bdvTh1uuY_zpK0ocnTxA1VJYIONdyZcvA9sCykYflKyVK40a_x8Y0IVL5QCBKmrvGGCSd7dp0FaDc2GMCcyu0pn-ekU10/s1600/IMG_0077-imp.jpg

And this is the technique I am showcasing on these new projects, the first one being this scrapbooked page of my Grandmother:
I used the heat embossing technique with the Boxed Blooms stamp set, and I stamped all four images on the same piece of watercolor paper, embossed and painted them using watercolors.
 
Some images I painted in the traditional way, but the images I liked the most are the ones where I dropped in color and then sprayed the paper with  my water bottle, allowing the colors run and bleed and move at random.
 
Once dry, I cut them out and used them as a border for this very special scrapbook layout of my Grandmother.
The next two projects are Coffee Gift Card Holders I created, using the same embossing technique, showcasing the Summer Sunshine & Coffee stamp set  and the Zen Coffee ATC#1 stamp set.  


This time I used my Jane Davenport Mermaid Markers to color in the embossed images and once they were dry, some I mounted onto the front of gift card sized envelopes and stamped "To:" and "From:" on the back...
Others I glued to the back of Library Card folders and stamped a spot for a message on the back.
So that is it for my very last post as a member of the STAMPlorations Design Team, I do hope I inspired you to go try one of my projects or techniques.  And here once again is the link to all the details for the STAMPlorations 5th Birthday Bash... I hope I see some of your work linked up!

Lynne Mizera
For the STAMPlorations Mixed Media Design Team
 
And don't forget that my coupon code gets you 20% at check out even on Sale Items!!
STAMPLORATIONS PRODUCTS USED:

Monday, May 28, 2018

Playing With Stencils, Distress Inks and Micro Glaze - Who Knew?


Hello everyone!  Today I am here with my last tutorial post for the STAMPlorations mixed media design team this year.  Before I get started I just want to say that it has been a wonderful two years working with these products and being supported by my warm and caring and very talented teammates.  And, although I am leaving the design team to spend more time on my art career, I will continue to use my STAMPlorations products in new and creative ways which of course I will continue to share with all of you on my own blog.

So for this final tutorial post I am sharing how you can create fantastic backgrounds using ARTplorations Stencils, Ranger Distress Inks and Micro Glaze... three products that go together like peanut butter, honey and bananas.  And as usual for me, this is going to be a very photo-heavy post, so get nice and comfy so you can enjoy the scroll through all my process photos... Smile.

 
To be able to really explore this technique I decided to use tags cut from 140lbs watercolor paper using the largest die from the CUTplorations Manilla Tag Nesting Dies set.  I  knew watercolor paper would stand up much better to the many times I would be using my heat gun in this process which only has three steps, but with all my inks and stencils... gave me almost unlimited possibilities!  Here is my Process:
 

STEP 1: Apply Ink To The Tag Using A Blending Tool
This will be the main pattern in your background so choose stencil patterns and colors accordingly.  I like using the blending tool because I get better ink coverage and a very clean pattern.  I also use washi tape to hold the stencil in place so it doesn't move when I go in to layer on more colors of ink.  Once you have finished adding the first layer of colors use the heat gun to make sure it is completely dry.


STEP 2: Apply Micro Glaze Through The Stencil Over Top Of The Inked Pattern
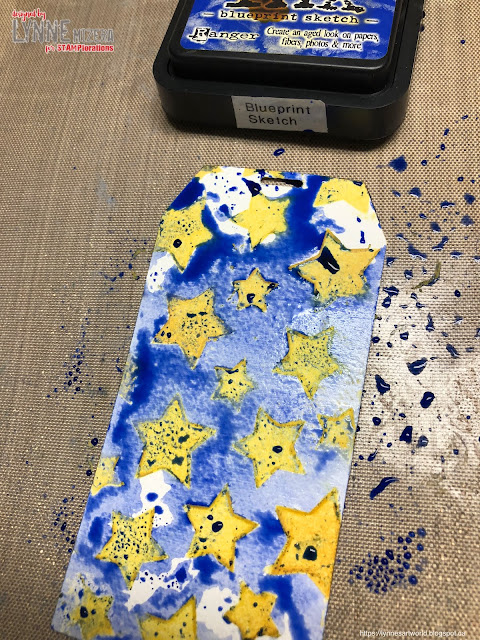
Remove and clean the ink off the stencil and then tape the clean stencil over top of the tag and using a new sponge on the blending tool, apply a layer of micro glaze.  Micro Glaze is a water resistant sealer created especially for paper and dries with no residue, it just disappears like magic leaving only the colors behind.  Because of this the color possibilities are endless, because you can protect each layer of color before adding the next one.  The thicker the layer of Micro Glaze the better the barrier will be between each color of ink so don't be afraid to really layer it on, even letting the glaze create ridges along the edges of the stencil.


STEP 3:  Add the Background Inks
Now for the fun part... on your craftmat create pools of ink by smooshing the ink pad onto the craft mat and spaying the smooshed ink with water until it puddles.  
 
Dipping the tag into these puddles are how you add the background color. and the Micro Glaze creates a barrier between the different colors. Dip and re-dip into one or more colors until you have the coverage you want.
  
 
and then use a heat gun to dry the tag.  The heat also causes the glaze to melt into the paper and disappear, but if there is any left behind, just use a paper towel to burnish off the excess.
 
Sometimes the second color of ink dries over top of the glaze but you can use a baby wipe to wipe off the last color without affecting the first color.
 

The more stencils and ink colors you have the more possibilities there are so don't limit yourself... just play and play!  Here are just a few of the backgrounds I created.


 And here are some of the finished tags:

It always amazes me how much YUMMIER everything is after adding a layer of Stickles and Liquid Glass!


Well that's it for this tutorial, I hope it inspires you to go play with your stencils and if you do, don't forget to link up to this month's Mixed Media challenge where it is always anything goes, except a card and you use a stencil, ANY stencil... the design team always chooses a winner and there are prizes!


And this month with the  "Things With Wings" Challenge going on until the end of the month there are even MORE prizes for join in by sharing your mixed media project using at least one stencil and something with wings!  (And of course the BIG SALE going on right now)

Lynne Mizera
for the STAMPlorations Mixed Media Design Team


 STAMPLORATIONS Products Used:

ARTplorations Bubble Dance

ARTplorations Daisy Play
ARTplorations Fearless
ARTplorations Oh My Stars
ARTplorations Retro Circles
ARTplorations Sanna Lippert-Flowers1
STAMPlorations Trendy Birds
CUTplorations Flutter Zen2
CUTplorations Dragonfly Layering Dies
CUTplorations Manilla Tags Nesting Dies